This Honey Bee Home is an Adorable DIY


This Honey Bee Home is an Adorable DIY
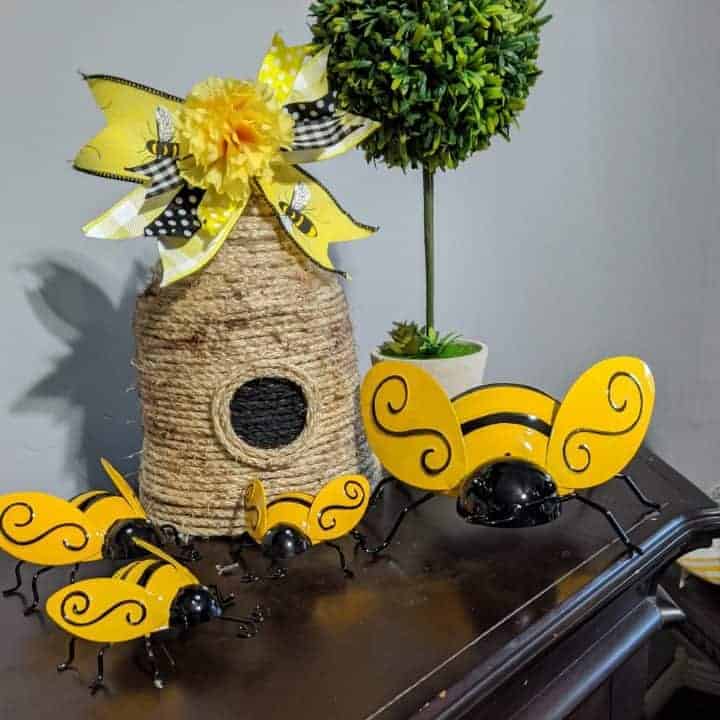
What is a bee Skep? Well it’s a Honey Bee Home. In early times beekeepers used straw baskets as honey Bee homes. They took skill and time to make. Want to see how they did it? Look at this article in Modern Farmer. Ours will not be that hard to make. It only requires a few materials and a Glue Gun to do. Let’s make some Honey Bee Home decor. Here is a fast overview.
Materials:
A form – I used a flower pot from Dollar Tree. If they don’t have them Home Depot has some that will work. A beach Bucket from Dollar Tree would also work. My flower pot is about 8 inches tall.
Rope- Nautical Rope from Dollar Tree will save you time because it’s fatter. I used Sisal Rope from Harbor Freight. (Use your Coupon)
Ribbon:
Poster Size Black marker from Dollar Tree
Black Craft Paint
Brown Craft Paint
A flower
A piece of twine
Tools:
Glue Gun This is the one I used for this project. They may also sell these at Walmart.
Glue Sticks These are the ones I buy as I use a lot of hot glue in my projects.
Small Art paintbrush
A popsicle stick
Making the Skep or Honey Bee Home
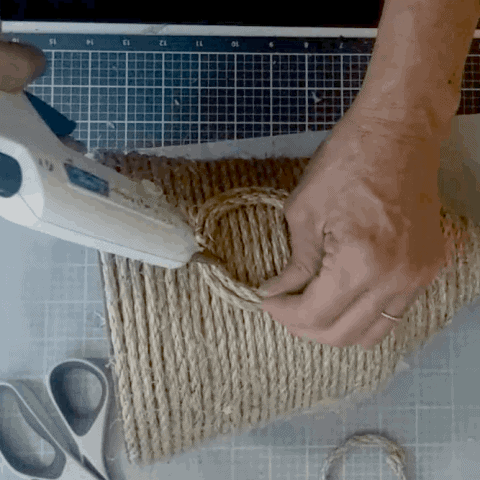
Begin by gluing the rope around the flower pot. Try not to let the glue seep out onto the rope as you work. Just keep gluing and turning and gluing and turning, and gluing and turning. I recommend you listen to a book, a podcast or music. You are going to here a while. The rope from the dollar tree was thicker than what I used, but they were out so I went to Harbor Freight and got the Sisal rope instead. After making this with the Sisal rope I see the reason most people use the Dollar Tree Rope. Thicker rope, less around and around.
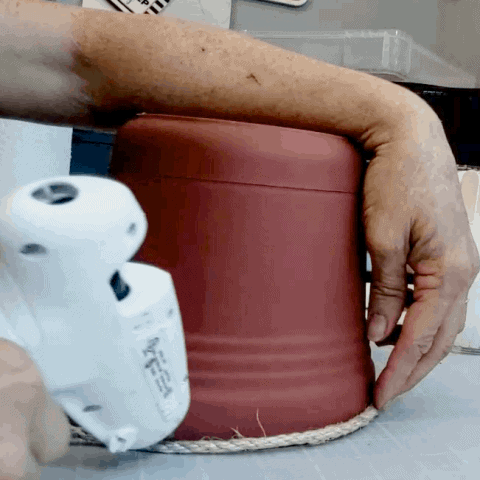
Because I was using a Dollar Tree flower pot as a form I just glued my rope right to the pot until I got to the top. If you are using a bowel as a form or something you need to keep be careful as you are gluing that you only get the glue on the rope and not the form so that you can remove it when you are done. I also used a popsicle stick to push the rows of rope together as I went. This helped with that darn the hot glue is hot thing too. I hate burned fingers.
 .
.
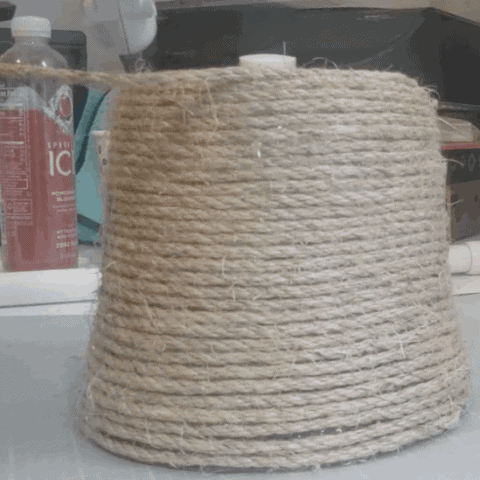
The tricky part comes when you have run out of flower pot. Now you have to glue the rope on the inside edge around and around getting smaller each time. Stop when your opening is about 2 inches wide, but don’t cut your rope.
Make the Hanger
Take a piece of rope about 20 inches long and glue the ends together by laying them next to each other and gluing up about 2 inches. Hold until dry. (Use your popsicle stick)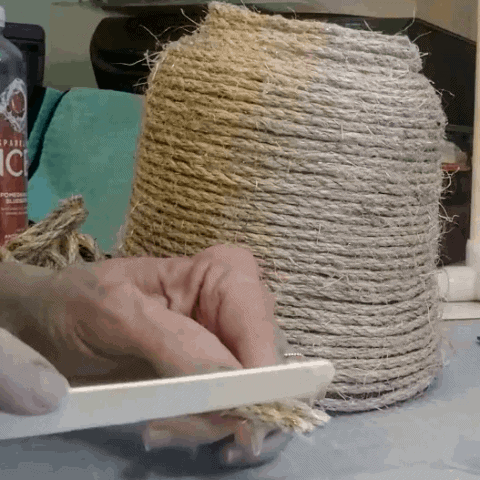
After the rope ends are glued together, glue them to the bottom of the flower pot. Use a generous amount of glue and your Popsicle stick to fold it down until it is dry. This hanger is decorative only. Don’t expect it to actually hold the skep for hanging.
Go Back to the Go-Around
Now keep going on the gluing the rope in circles making them smaller as you go. To do this you are going to be gluing the rope to the inside edge.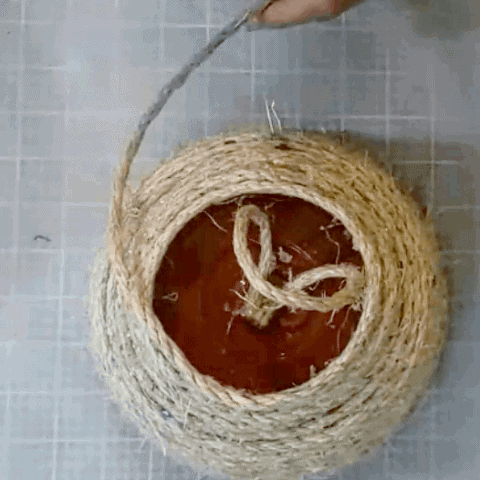
When you have your rope around the handle cut it off with about an inch to spare and tuck that down into the opening next to the handle. Put a drop of glue in it to hold it.
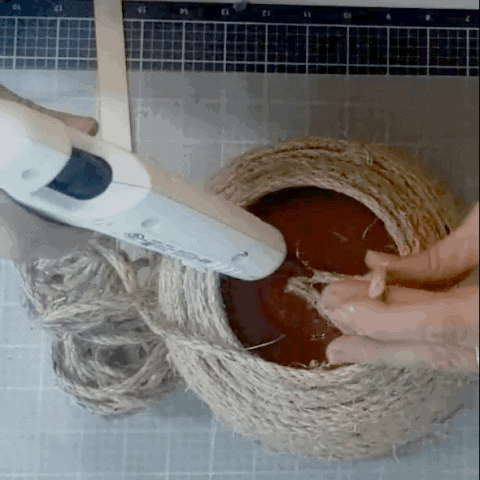
You can cut a piece of cardboard and glue it on the bottom of the pot and start the gluing around in circles again if you want to put a bottom on yours. I didn’t because it will not show anyway.
Make the Door
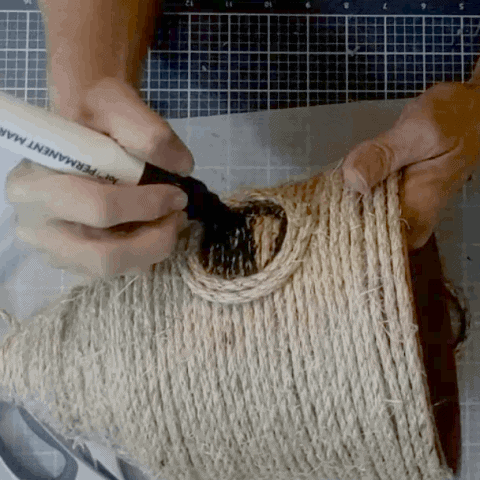
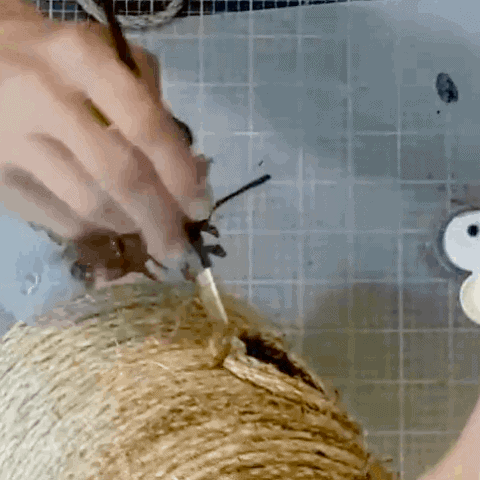
Next figure out where you want your door to go. Take a piece of rope and glue it in a circle in that spot you decided on. I thought a double rope would be cute. (That’s what we are going for right?) So I glued another rope around the first one.
Get that Marker and color inside the circle you just made to make it look like an opening. When you are done with the marker if it didn’t do a good job of covering it all take a bottle of Black craft paint and paint it. Now your door is done.
Grab your Paint the Last Step in the Basic Honey Bee Home
I used brown craft paint and just dry brushed it on the whole thing just sort of randomly. I think it adds depth and dimension to the Skep. when you are done with this you now have a basic honey bee home.
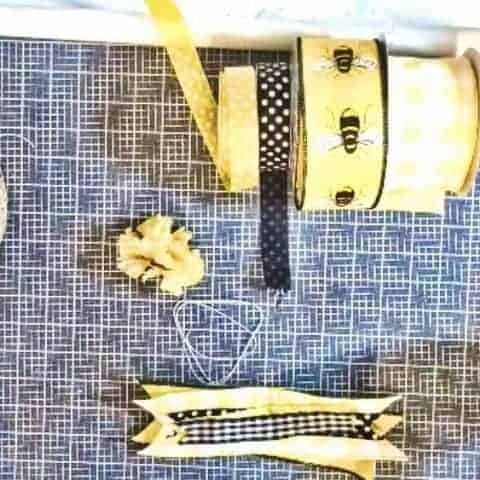
Let’s make a Bow
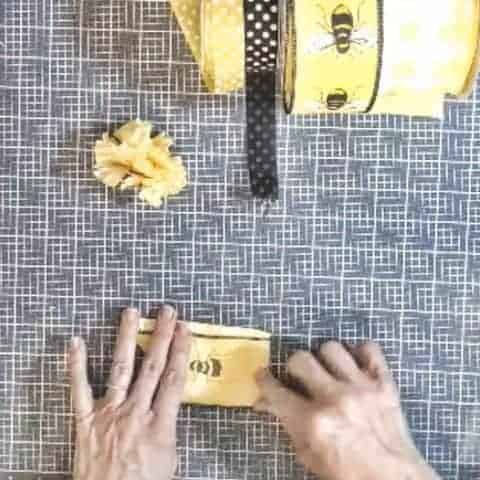
I used 2 2 1/2 inch wired ribbons, and 3 1 inch wired ribbons. Cut the wider ribbons into 9 inch pieces, and the smaller ones into 7 inch pieces. There isn’t a picture of Dovetailing them but to do that you just fold the ribbon in half lengthwise and cut a notch from the fold to the outside. Take your ribbons and stack them on top of each other with the wide ones on the bottom.
Now find the center by folding in half.
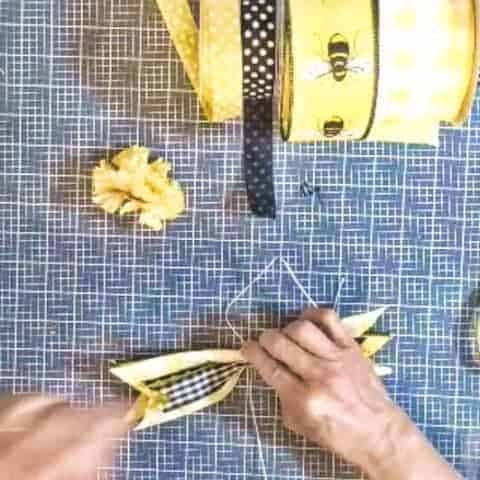
Open the ribbon back up flat and take your piece of twine and slide it under the stack at the center.

Now pinch the middle so it is shaped like a bow tie.
While holding the pinch wrap the twine around the middle several times, flip it over and tie a knot in the back. Tie it as tight as you can get it. Now slip the flower stem into the twine.
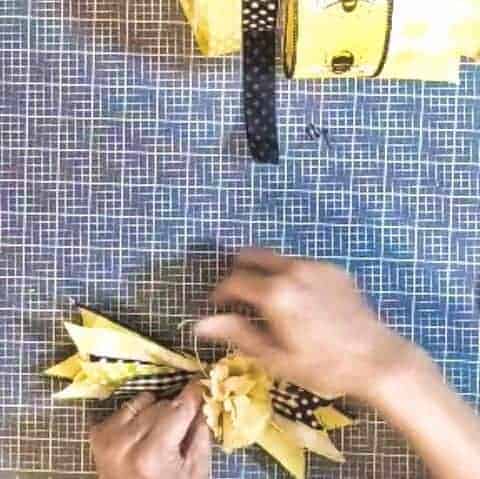
Now tie the bow to the top, and cut off any excess twine. Make it the shape you want it by moving the ribbons around. I would start with pulling the bottom two into a diagonal across from each other, then the next one so you have made sort of an x with them. Now fill in with the smaller ribbons by doing the same thing.

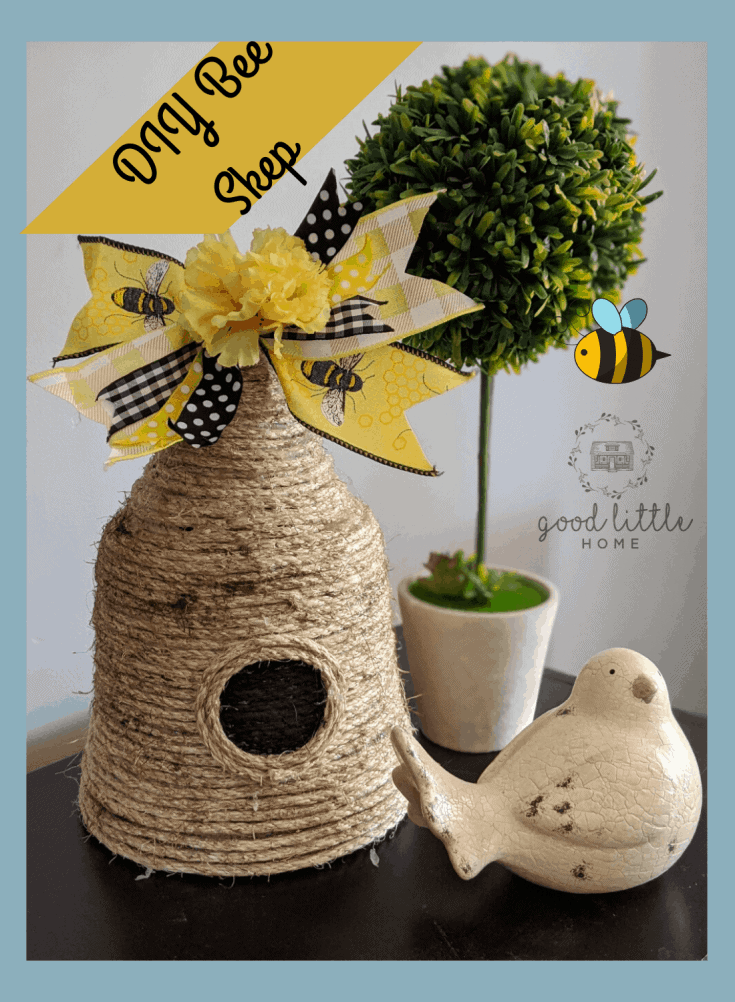
You now have an adorable little honey bee home decor for your bee themed spaces.
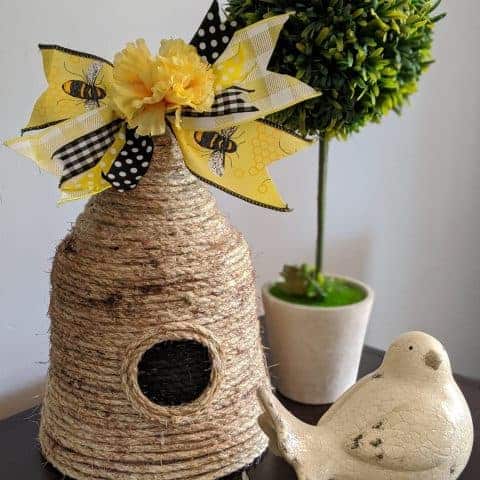
I hope you liked my tutorial for Honey Bee Home decor. This would be such a cute centerpiece or placed on a patio as bee skep decor in a bee themed patio.
If you have enjoyed this post please share it on Pinterest. Don’t forget to subscribe to our Newsletter, like us on Facebook, and follow us on Instagram.
Till Next Time…

This Honey Bee Home is an Adorable DIY
This Honey Bee Home Decor is so cute and easy to make. It also thrifty as most of the materials come from the Dollar store.
Materials
- Flower Pot, I got mine at dollar tree , its about 8 inches tall
- Rope, you can use the Nautical craft rope from dollar tree, you need 4-5 packeges, I used sisal rope from Harbor Freight
- Bee Ribbon
- Black Poka Dot Ribbon
- Yellow Poka Dot Ribbon
- Buffalo Plaid Ribbon
- Poster Size Black marker from Dollar Tree
- Black Craft Paint
- Brown Craft Paint
- Artifical Flower
- Twine
Tools
- Glue Gun, I have several but this is the one I used
- Glue Sticks, these are the ones I buy
- Art Paint Brush
- A popsicle stick
Instructions
Making the Skep or Honey Bee Home
Begin by gluing the rope around the flower pot. Try not to let the glue seep out onto the rope as you work. Just keep gluing and turning and gluing and turning, and gluing and turning. I recommend you listen to a book, a podcast or music. You are going to here a while. The rope from the dollar tree was thicker than what I used, but they were out so I went to Harbor Freight and got the Sisal rope instead. After making this with the Sisal rope I see the reason most people use the Dollar Tree Rope. Thicker rope, less around and around. 
Because I was using a Dollar Tree flower pot as a form I just glued my rope right to the pot until I got to the top. If you are using a bowel as a form or something you need to keep be careful as you are gluing that you only get the glue on the rope and not the form so that you can remove it when you are done. I also used a popsicle stick to push the rows of rope together as I went. This helped with that darn the hot glue is hot thing too. I hate burned fingers. 
The tricky part comes when you have run out of flower pot. Now you have to glue the rope on the inside edge around and around getting smaller each time. Stop when your opening is about 2 inches wide, but don't cut your rope. 
Make the Hanger
Take a piece of rope about 20 inches long and glue the ends together by laying them next to each other and gluing up about 2 inches. Hold until dry. (Use your popsicle stick)
After the rope ends are glued together, glue them to the bottom of the flower pot. Use a generous amount of glue and your Popsicle stick to fold it down until it is dry. This hanger is decorative only. Don't expect it to actually hold the skep for hanging. 
Go Back to the Go-Around
Now keep going on the gluing the rope in circles making them smaller as you go. To do this you are going to be gluing the rope to the inside edge.
When you have your rope around the handle cut it off with about an inch to spare and tuck that down into the opening next to the handle. Put a drop of glue in it to hold it. 
You can cut a piece of cardboard and glue it on the bottom of the pot and start the gluing around in circles again if you want to put a bottom on yours. I didn't because it will not show anyway.
Make the Door
Next figure out where you want your door to go. Take a piece of rope and glue it in a circle in that spot you decided on. I thought a double rope would be cute. (That's what we are going for right?) So I glued another rope around the first one. 
Get that Marker and color inside the circle you just made to make it look like an opening. When you are done with the marker if it didn't do a good job of covering it all take a bottle of Black craft paint and paint it. Now your door is done.
Grab your Paint the Last Step in the Basic Honey Bee Home
I used brown craft paint and just dry brushed it on the whole thing just sort of randomly. I think it adds depth and dimension to the Skep. when you are done with this you now have a basic honey bee home.
Let's make a Bow
I used 2 2 1/2 inch wired ribbons, and 3 1 inch wired ribbons. Cut the wider ribbons into 9 inch pieces, and the smaller ones into 7 inch pieces. There isn't a picture of Dovetailing them but to do that you just fold the ribbon in half lengthwise and cut a notch from the fold to the outside. Take your ribbons and stack them on top of each other with the wide ones on the bottom. 
Now find the center by folding in half.
Open the ribbon back up flat and take your piece of twine and slide it under the stack at the center.
Now pinch the middle so it is shaped like a bow tie. 
While holding the pinch wrap the twine around the middle several times, flip it over and tie a knot in the back. Tie it as tight as you can get it. Now slip the flower stem into the twine.

Now tie the bow to the top, and cut off any excess twine. Make it the shape you want it by moving the ribbons around. I would start with pulling the bottom two into a diagonal across from each other, then the next one so you have made sort of an x with them. Now fill in with the smaller ribbons by doing the same thing. 
You now have an adorable little honey bee home decor for your bee themed spaces.